

One of the best ways to protect your Seller Center account is to have an extra form of security. 2-step verification is a multi-factor verification method that drastically reduces the chances of having the information in your Seller Center account compromised. In this guide, we'll show you how to enable 2-step verification for all users listed on your Seller Center account.
What is multi-factor verification?
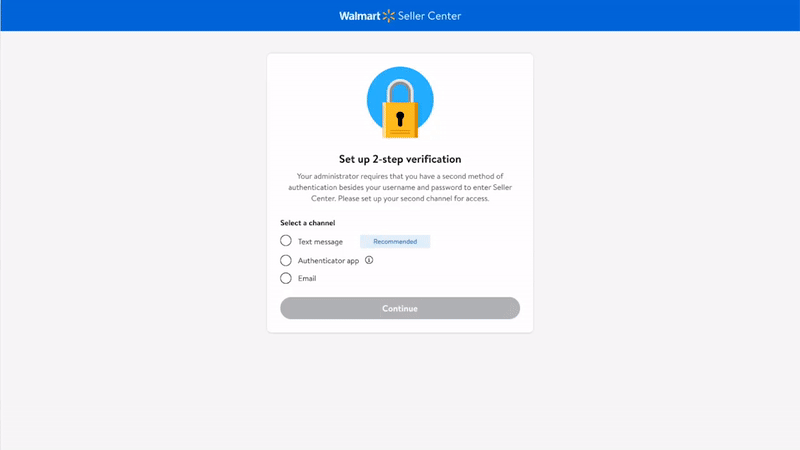
Multi-factor verification adds an extra layer of security to your Seller Center account before you can log in or add a new user to your account. If you choose to enable this feature, you can set it up via email, text or through an authenticator app. Once enabled, all Seller Center users on your account will be required to enter a temporary, one-time verification code each time they log into Seller Center or add a new user.
Enable 2-step verification
Step 1 – Get started
Navigate to the Home page in Seller Center, select the Settings button in the top navigation bar and select 2-step verification. Select the toggle and choose Turn on when asked to confirm your intent to enable 2-step verification. Only admin-level users can enable 2-step verification.
Step 2 – Set up your authentication method
Each individual user on your Seller Center account will need to set up their preferred authentication method. Once 2-step verification is enabled, all users on the account will be prompted to choose an authentication channel the next time they log into Seller Center. You can choose between using an authenticator app, email or text.
Authenticator App:
An authenticator app provides a one-time, six-digit code that changes every 30 seconds. If you choose to use an authenticator app for verification, you’ll need to input a one-time code each time you log into Seller Center. To set up the authenticator app channel, log in to your Seller Center account and choose Authenticator app. You can use the authenticator app of your choice including Google or Microsoft Authenticator, etc.
Next, choose Go to setup key and download your chosen authenticator app. Connect the app to Seller Center by scanning the QR code shown on the screen or entering a setup key into the app. Enter the code from your authenticator app and select Verify.

Email:
If you choose to verify via email, you'll be asked to enter a one-time verification code that will be sent to the email address associated with your account each time you log into Seller Center. This code is valid for 10 minutes. To set up the email authentication channel, log in to your Seller Center account and choose Email. Enter the email address associated with the account and then enter the one-time code sent via email and choose Continue.

Text Message:
If you choose to verify by text, you’ll be asked to enter a one-time verification code that will be sent to the phone number associated with your account each time you login into Seller Center. This code is valid for 10 minutes.
To set up the text authentication channel, log in to your Seller Center account and choose Text. Enter the phone number associated with the account and then enter the one-time code sent via text and choose Continue.
At this time, text authentication is only available to sellers with U.S. phone numbers.