Getting started
Item setup
Catalog management
Item management
How to update content: Overview
Update an item draft in Seller Center
Update item content individually in Seller Center
Update item content in bulk in Seller Center
Delete an item in Seller Center
Update SKUs in bulk in Seller Center
Update a product ID
Cross-list items across markets
Manage duplicate listings in Seller Center
Retire items in Seller Center
Reactivate items in Seller Center
Track item setup or maintenance activity in Seller Center
Seller-fulfilled inventory management
Price management
Reporting
Troubleshooting
Walmart Fulfillment Services (WFS)
Seller Fulfillment Services
Listing optimization
Order management
Taxes & payments
Policies & standards
Growth opportunities
Advertising
Walmart Seller app
To update content for multiple items at once, you can set up a Walmart template to make your updates by attribute or GTIN (Global Trade Identification Number). In this guide, we’ll show you how to set up the template and use each method.
Update by attribute
Step 1 – Get started
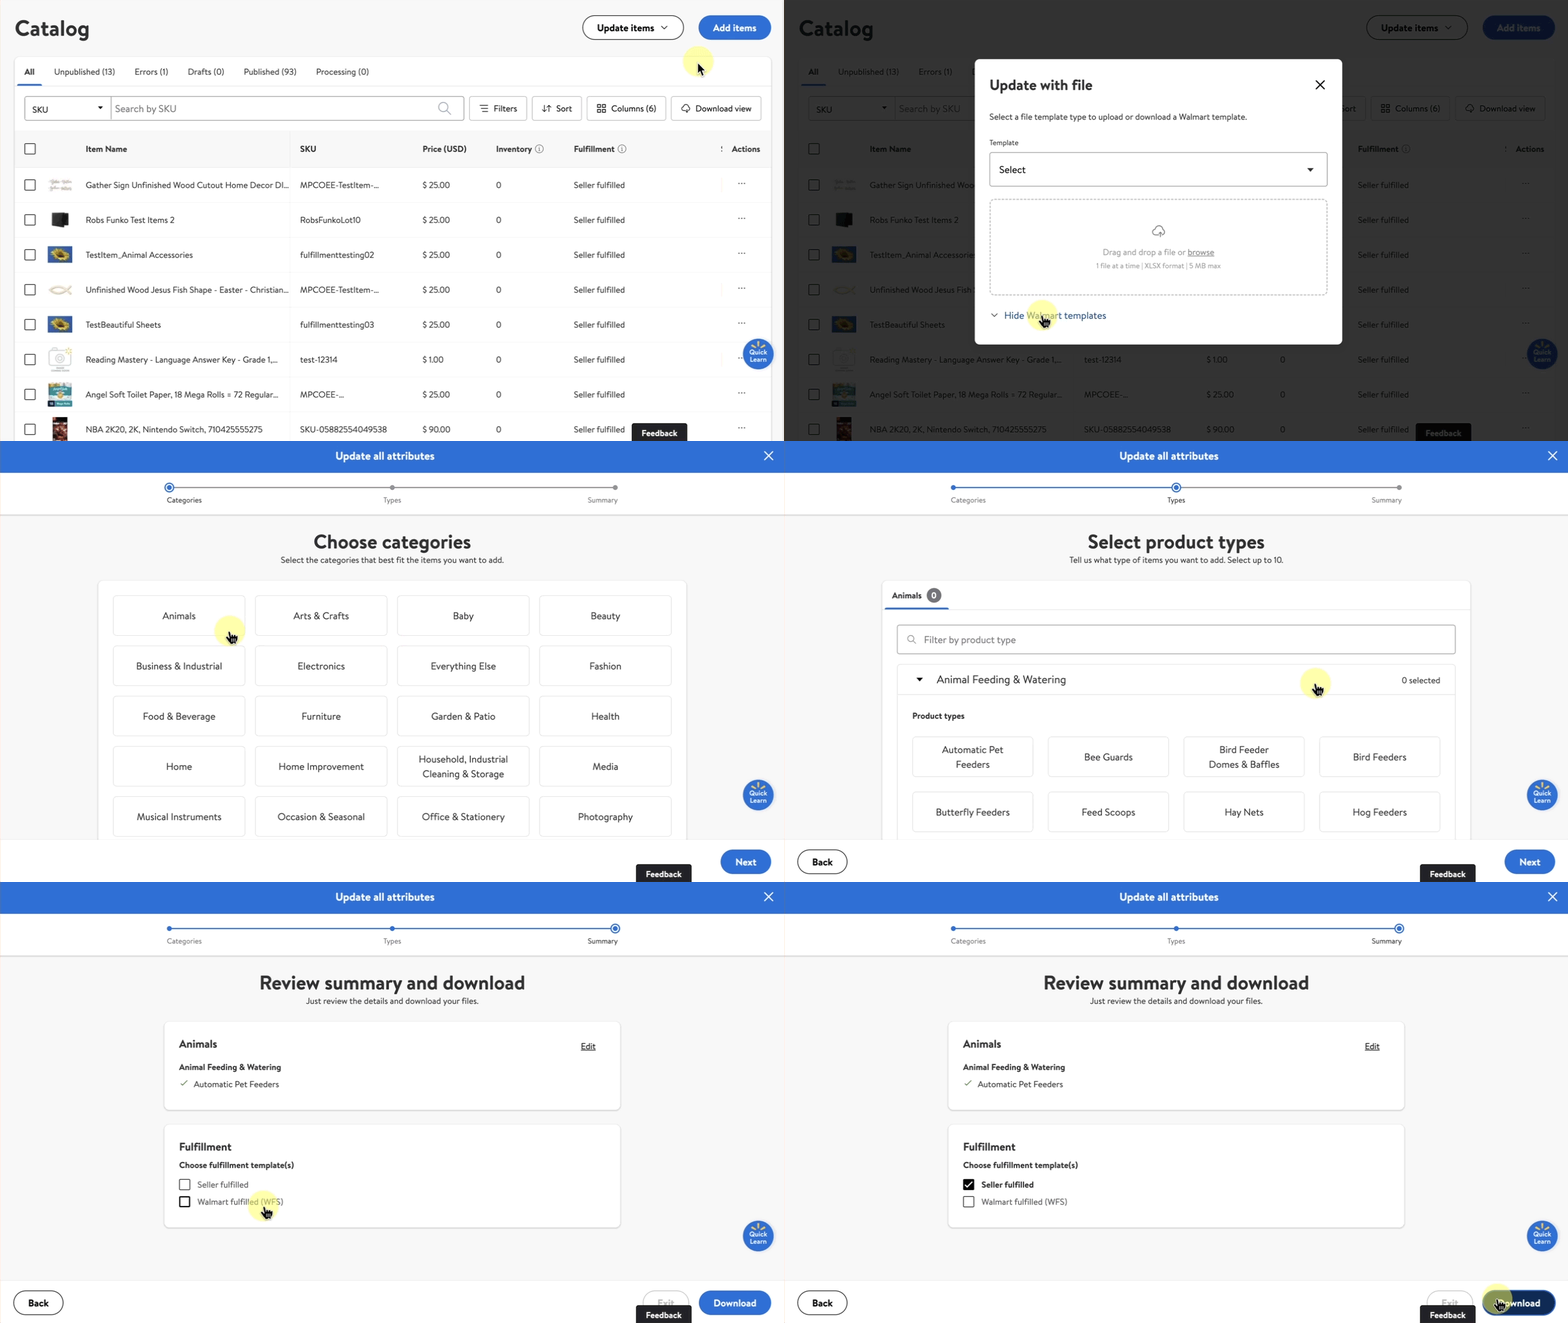
Navigate to your Catalog in Seller Center. Select Update items and choose Update with file from the dropdown menu.
Step 2 – Download and complete the template
Select Show Walmart templates and choose Update all attributes. Select the product categories that best fit the items you want to update, then choose Next. Then, choose up to 10 product types.
Once you’ve chosen your product types, choose Next. Finally, choose your preferred fulfillment option. When you’re ready, select the Download button.

In the template, you’ll provide the SKU, product type and product identifier. You can remove the rest of the attributes or update them based on your needs.
If you aren't sure which classification to choose, review our content standards.
Step 3 – Upload the template
Once you’ve filled out the template, you can upload it by navigating back to your Catalog in Seller Center, then select Update Items and choose Update with file from the dropdown menu. Select the Update all attributes file type and your preferred fulfillment type, then upload your file.
After submitting the template, you can track its status from the Activity Feed in Seller Center. Updates may take up to 24 hours. Any data errors that are detected during the updates will require extra processing time.
To ensure a high-quality shopping experience, Walmart selects the best content for each item attribute, giving priority to content provided directly by brand owners and their authorized resellers. Because brand owners and authorized resellers have priority, there are times when you won’t be able to decide what content is published on Walmart.com. This means that if you don’t have brand owner privileges, you won’t be able to update some content fields, including blank fields.

Update by GTIN
Step 1 – Get started
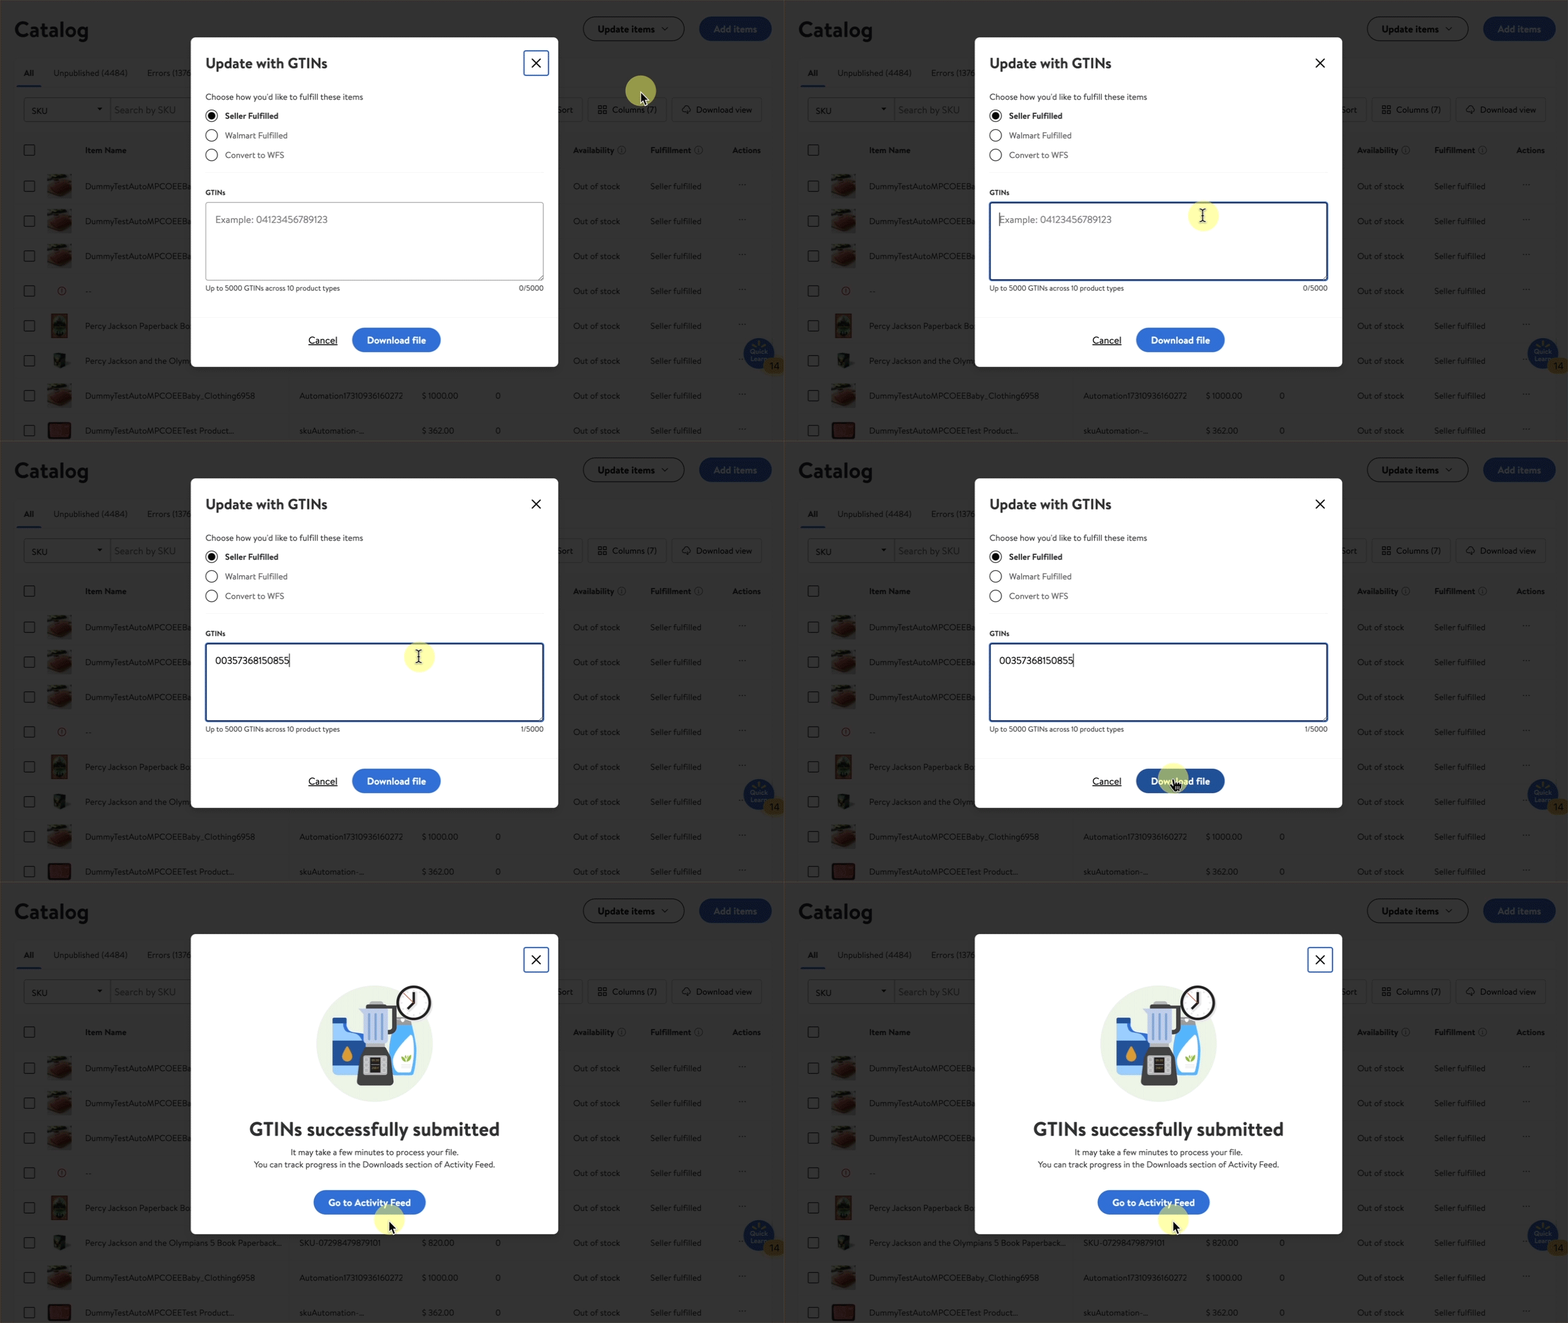
Navigate to your Catalog in Seller Center. At the top right, select Update items and choose Update with GTINs from the dropdown menu.
Step 2 – Provide GTINs
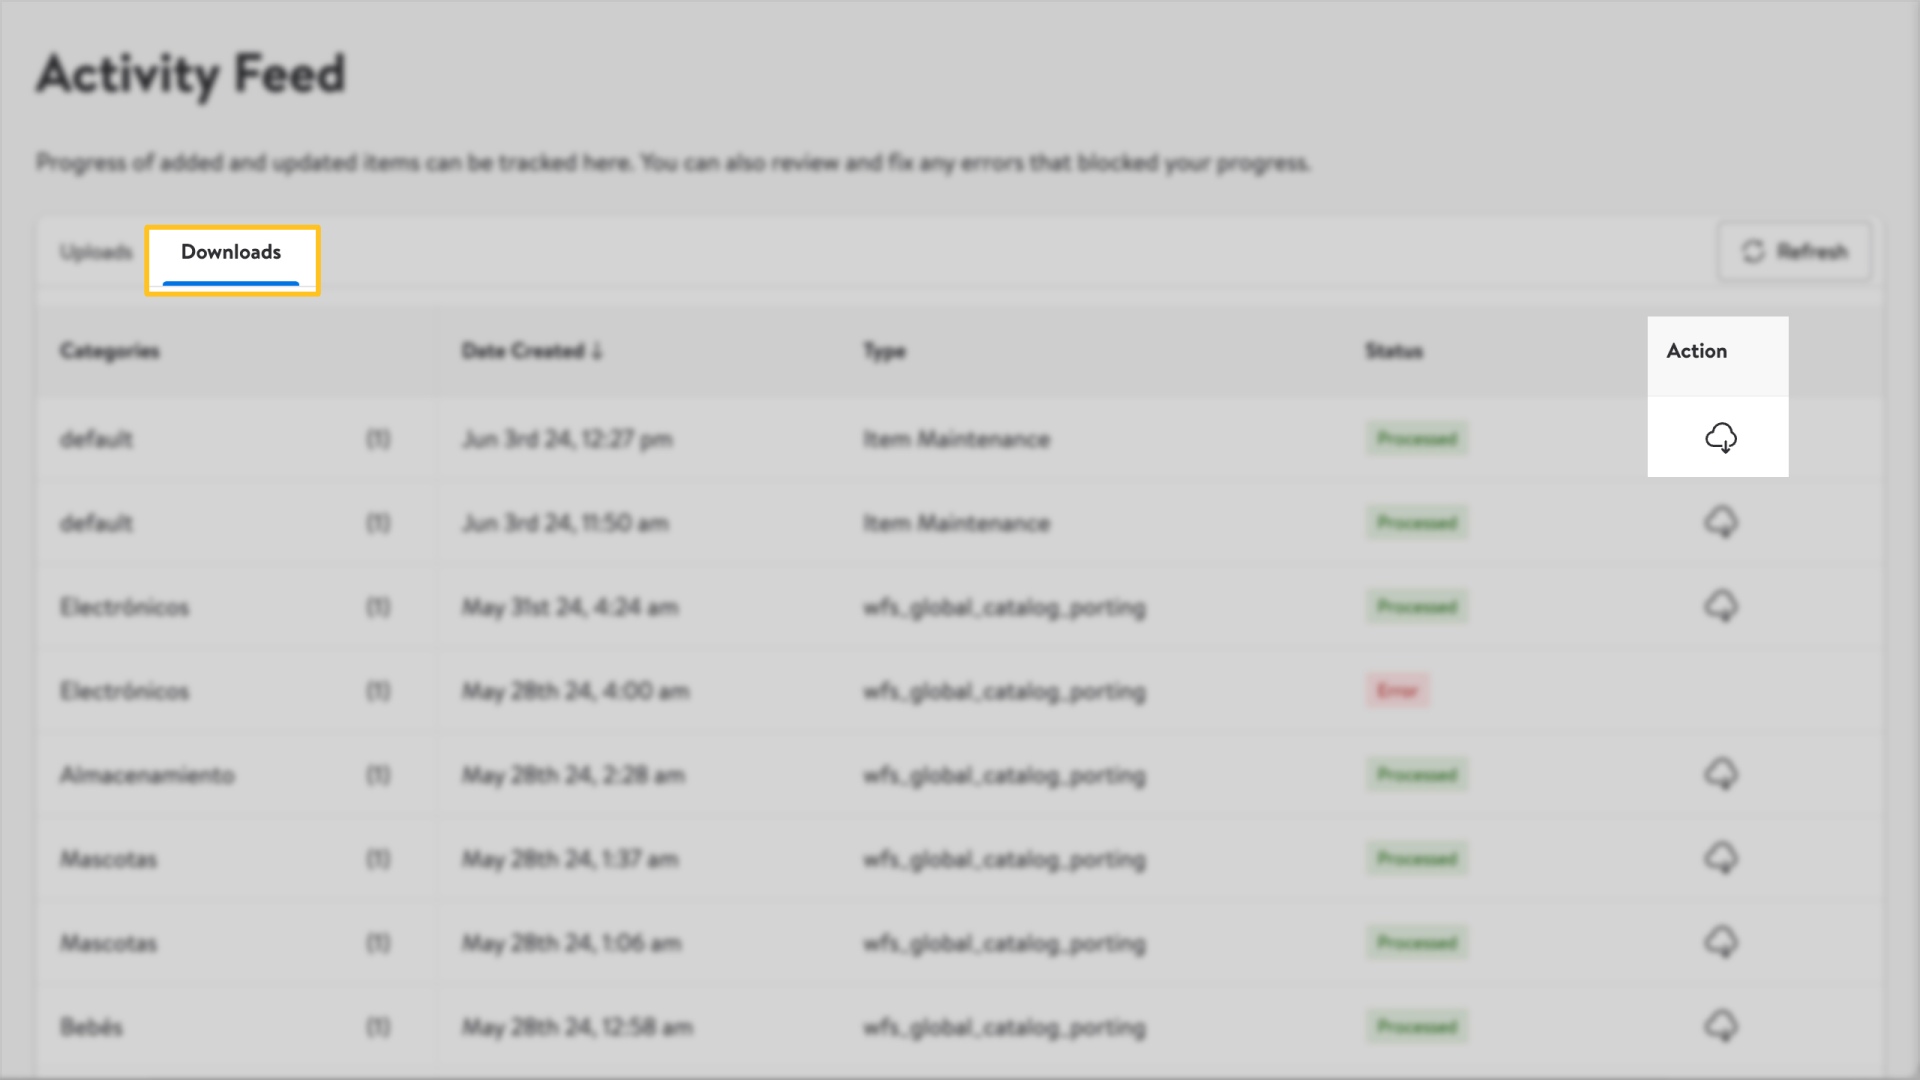
Add up to 5,000 GTINs into the field using commas to separate each value and choose a fulfillment method. Next, select Download file Create File and an editable template will be available in the Downloads tab on the Activity Feed dashboard. Once you’ve downloaded your pre-populated file, you can make updates in the template as needed.

If you copy and paste multiple GTINs from an Excel template into the field, the commas will automatically appear.
You can only enter GTINs for 10 product types at a time.
Step 3 – Upload the template
Once you’ve appropriately filled out the template, you can upload it by navigating back to your Catalog in Seller Center, then select Update Items and choose Update with file from the dropdown menu. Select the Update all attributes file type and your preferred fulfillment type, then upload your file.
After submitting your template, you can track its status from the Activity Feed in Seller Center. Updates may take up to 24 hours. Any data errors that are detected during the updates will require extra processing time.
To ensure a high-quality shopping experience, Walmart selects the best content for each item attribute, giving priority to content provided directly by brand owners and their authorized resellers. Because brand owners and authorized resellers have priority, there are times when you won’t be able to decide what content is published on Walmart.com. This means that if you don’t have brand owner privileges, you won’t be able to update some content fields, including blank fields.
