Getting started
Item setup
Catalog management
Listing optimization
Order management
Order status
Order Management Dashboard in Seller Center
Manage Order Status - Acknowledge, Ship, or Cancel Orders
Customer care
Returns & refunds
Reporting
Troubleshooting
Taxes & payments
Policies & standards
Growth opportunities
Shipping & fulfillment
Walmart Fulfillment Services (WFS)
Other Topics


The redesigned Order Management dashboard includes changes to the Order Details view and provides:
- An intuitive presentation of order details for easy visibility, so no horizontal scrolling.
- Improved workflows for order acknowledgement, fulfillment, and cancellation.
- Clear display of customer details and links to copy customer email from this interface.
For an overview of how to navigate the Order Management Dashboard, please review the Order Management Dashboard in Seller Center article.
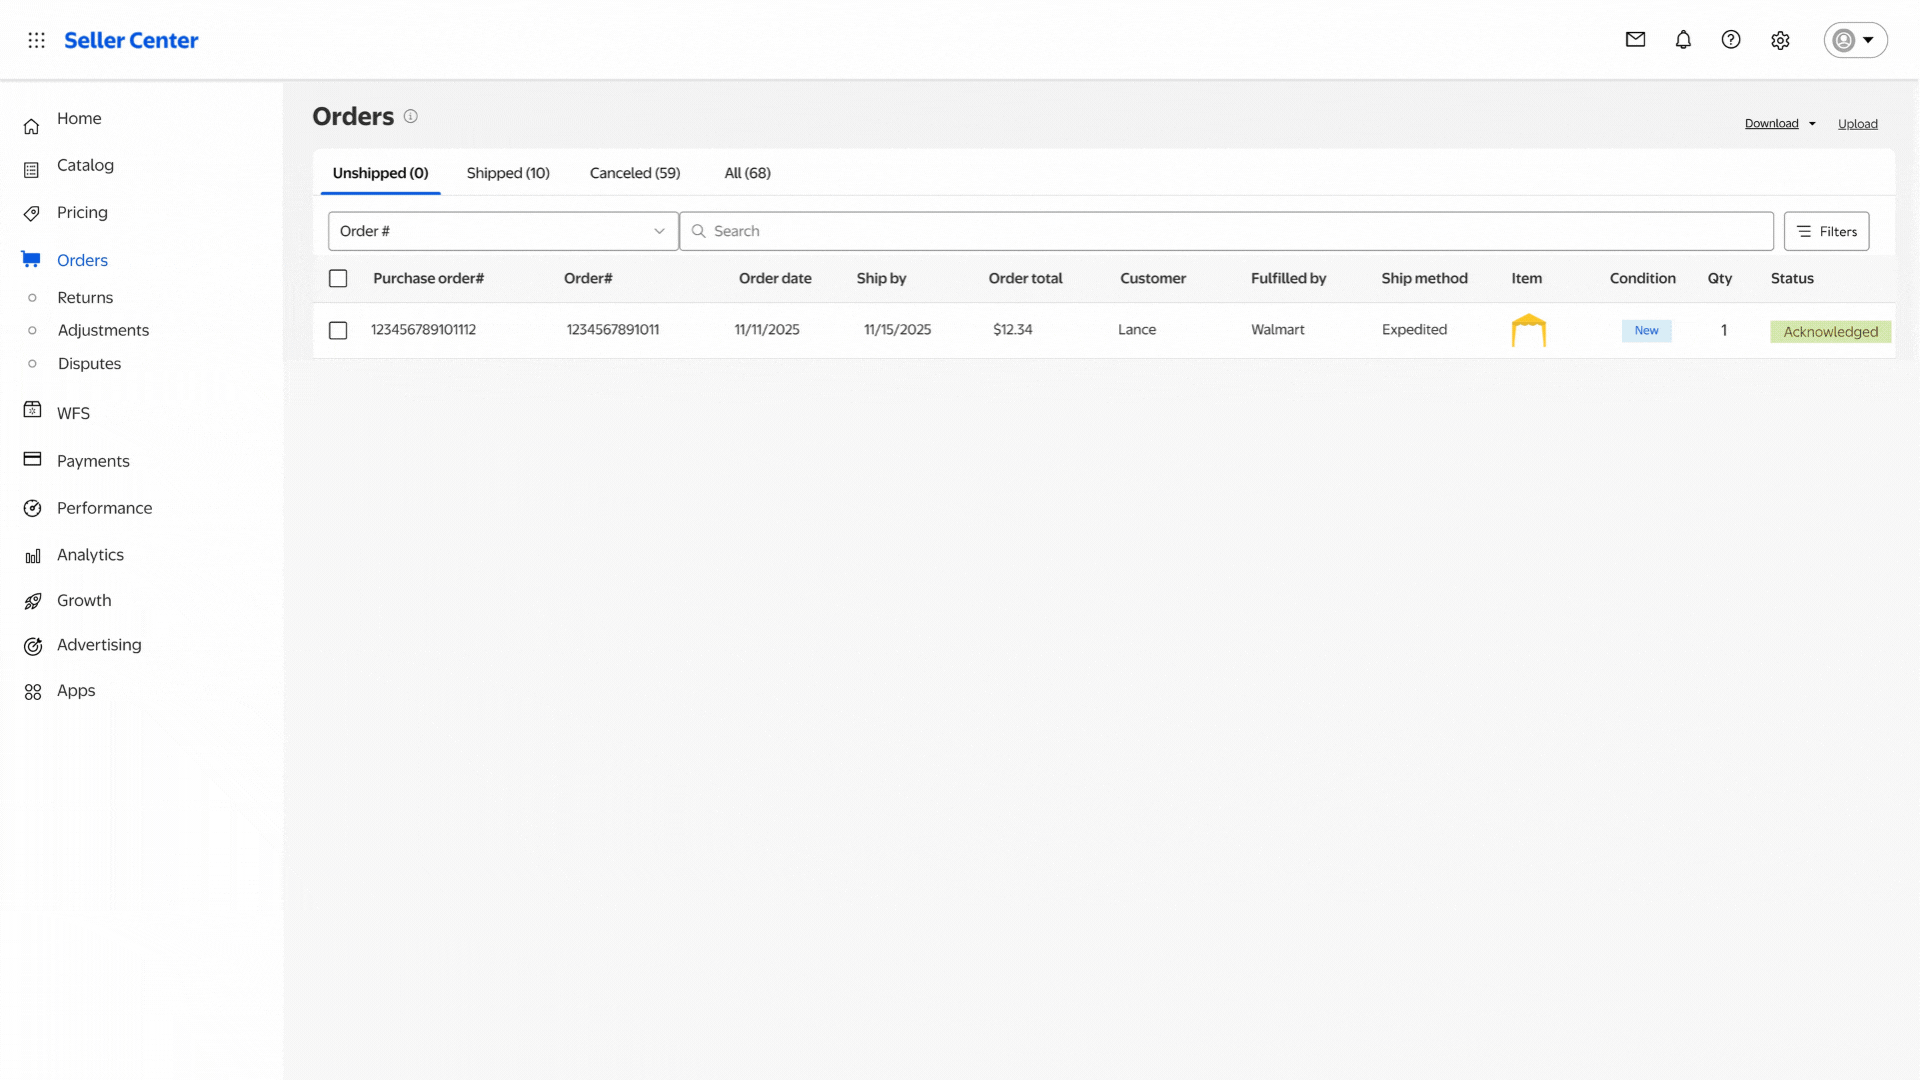
Manage Orders
You can choose to fulfill orders individually or in bulk via the Seller Center Order Management dashboard.
Please ensure that orders are marked as shipped and physically shipped prior to the Ship by Date. Orders that have not been shipped more than 7 days past the Ship by Date will be cancelled.
Update Individual Purchase Orders
Order Details | Meaning |
Ship Status | Allows sellers to view the status of items in the order, print packing slips, and update the order to shipped. |
Unshipped | Shows items in the order that have not yet shipped to the customer |
Shipped | Shows items in the order that have shipped. |
Cancelled | Shows items in this order that were cancelled. |
Delivered | Shows items in the order that have been delivered. |
Download, Print, or Cancel Order | These options allow the seller to download the order details, print packing slips or cancel the order. |
Order Details | Shows the Order number, Ship method, and important dates for the order – including Ship by and Deliver by dates. |
Customer Details | This tile includes the customer’s name, address, and links to copy an email address. |
Payment Details | A breakdown of the cost of the item including subtotal, tax, and shipping cost. |
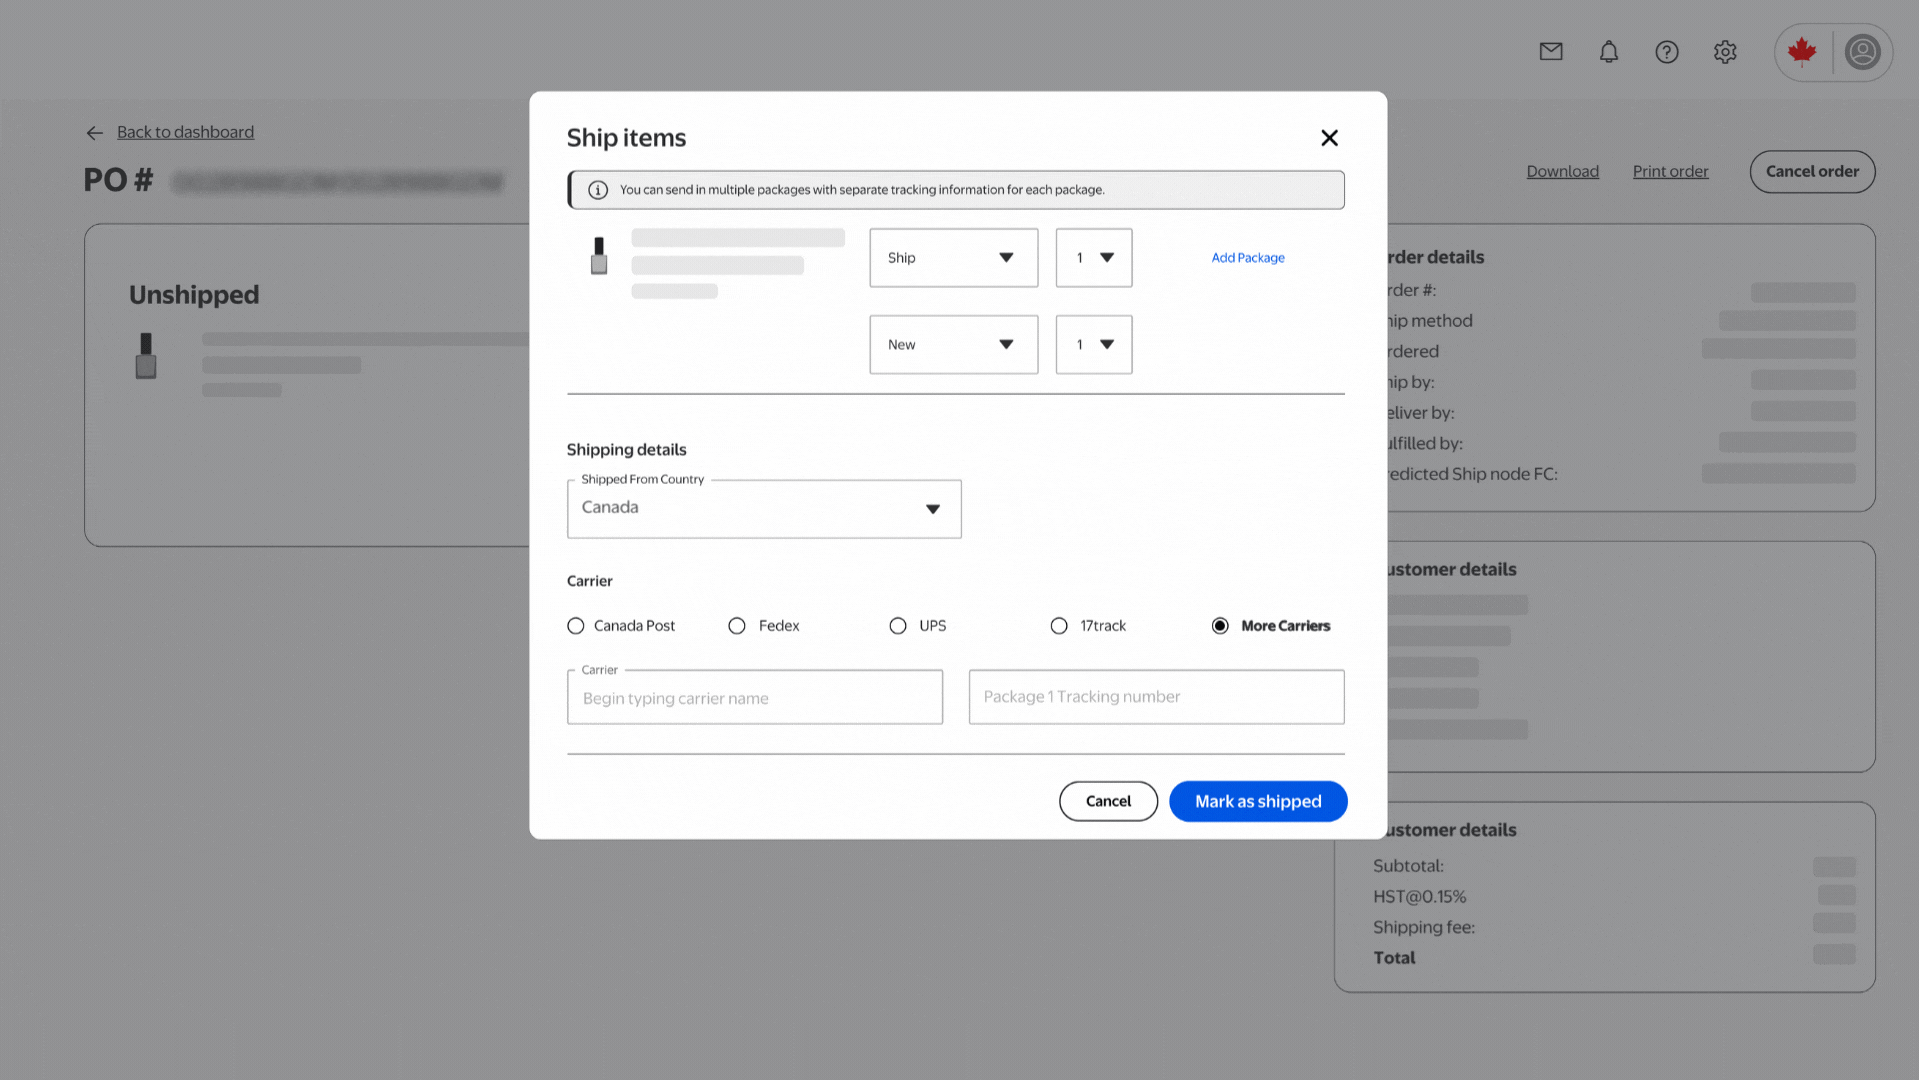
- Update orders one at a time in Seller Center by selecting Orders under Order Management and choosing the Purchase Order # link to open the order details interface.
- Select Ship items, or the Ellipsis (three dots).
Choose Ship from the dropdown, to open the action window.
Select the dropdown to the right of the item description to select Ship.
Next, select your Carrier from the first 4 options available or by clicking More Carriers and selecting from the dropdown menu.
Enter the Tracking number in the text box.
Once these fields are completed, click Mark as shipped.
If you do not find your preferred carrier in the drop-down menu, choose "Other Carrier". You will need to provide the carrier’s name, tracking ID and tracking URL as mandatory fields.
Partial Shipments
If the items in the order cannot be shipped together due to size, sellers can ship items individually.
- Select Ship items to open the action window.
- Then select ship in the first dropdown, followed by the quantity of items you wish to ship in the box. Designate the remaining items as new.
- Enter the Carrier details and Tracking number as usual. The remaining quantities will appear on a new line where you can then provide different tracking details for those units.
- Once complete, click Mark as shipped. This splits the order and tells us you're shipping some items now.
- When you’re ready to ship the rest of the order, simply repeat the process for the remaining items using the same PO#.
You can now ship partial quantities at different times. The items can be separated into multiple shipments.
Multi-box Shipments
Multi-box means a single item that’s shipped in multiple boxes. It’s ideal for large, bulky items, such as a trampoline with a safety net, jump mat and legs. This not only gives you more flexibility in shipping items and it also gives customers a wider variety of products to choose from.
To ship a item in multiple boxes follow the below steps:
- Select Ship items to open the action window.
- Then click on the Add package option and select the number of packages you want to ship the item.
- Enter the Carrier details as usual and Tracking number for each package.
- Once complete, click Mark as Shipped. This will update the item with multiple packages each with a unique tracking.

Cancel Orders
- If you cannot ship an order, cancel the order in Seller Center. Follow the instructions below for Bulk Cancellations.
- Please note that canceling an order is not recommended as it results in a negative customer experience and can negatively affect your Seller Performance Standards.
- Cancellations cannot be reversed. You should verify that there are no other options before cancelling an order. See the following section for customer-initiated cancelation requests.
Steps to cancel an order
- If you need to cancel an unshipped order individually, locate the PO and open the Order Details view.
Click on Cancel Order in the top right corner to cancel the entire order. - Partial quantity cancellation is unavailable. You can only cancel entire items or orders or items which are unshipped.
After you choose to cancel the order or item, you will see an action screen. The text displayed may be different depending on the path you choose.
3. Carefully read the message and if you wish to proceed, choose a Cancel reason from the dropdown provided.
- Cancel – You want to cancel a specific order line or the entire order.
Cancel Requested by Customer – A customer has requested to cancel an order or item at their discretion. - If you do not see this option when cancelling your order, inform the customer that they must request a cancellation using their Walmart Account or through Walmart Customer Care.
4. Once you select the reason from the dropdown, the message changes to inform you of the cancellation. You must choose
Yes, cancel order to proceed. This action will cancel the order or specific order line, and you can now view this Purchase Order under the Cancelled status option on the Order Management dashboard.
- If you do not wish to cancel the order or specific order line, choose Do not cancel order to close the action screen.
.gif?branch=ca_mplearn)
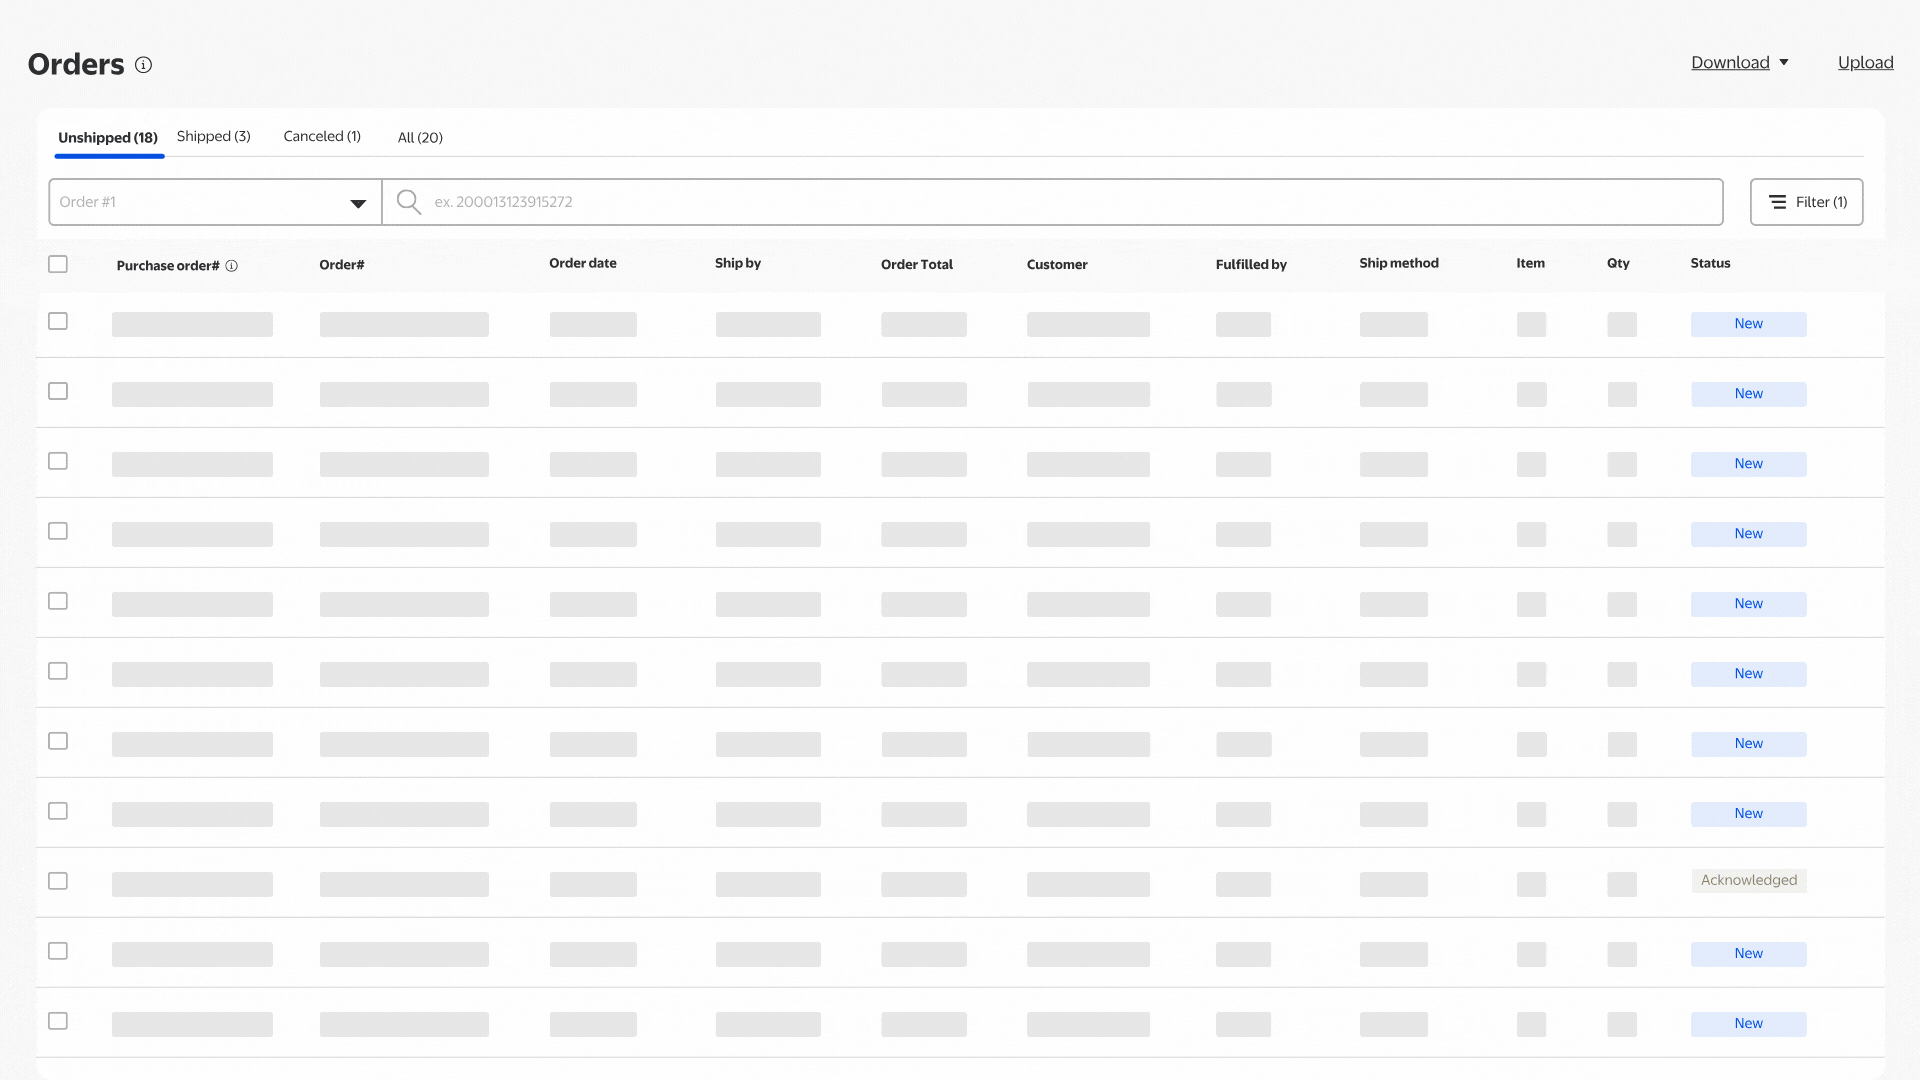
Update Orders in Bulk
Sellers can select one or more checkboxes to the left of the order row to perform actions, including acknowledge, download a bulk order update file, and print packing slips.
Steps to download all unshipped orders
- Click Download in the top right corner and choose from the dropdown options:
- Export Page – Export the items listed on the current page.
- Export All Items – Export all Unshipped orders.
- Downloaded Files – View all your downloaded reports.
2. Open the file the downloaded file and find the Update Status column. Select the desired status for each order from the dropdown.
The order statuses are:
- Acknowledge – If an item is in this status by default, it has been Acknowledged already. If the item is in Ordered status, you should change the status to Acknowledge. Remember that you must update inventory when you acknowledge orders. See Calculating Inventory for more details.
Ship – Once you have shipped an item, you should change the Order Status to Ship. Make sure to fill out the other required shipping attributes: Carrier, Tracking Number, and Tracking URL. Refer to Providing Valid Tracking Numbers For Shipments for more information. Cancel – If you are cancelling an entire order or specific order line, choose from the Cancellation Reasons listed above.
You are responsible for providing accurate information, ensure that you double-check the carrier you enter. If you do not find your preferred carrier in the drop-down menu, choose "Other". You will need to provide the carrier's name, tracking ID and tracking URL as mandatory fields.
- Cancel – If you are cancelling an entire order or specific order line, choose from the Cancellation Reasons listed above.
3. Save the updated Bulk Order Update file without changing the file type.

Partial Order Shipments in Bulk
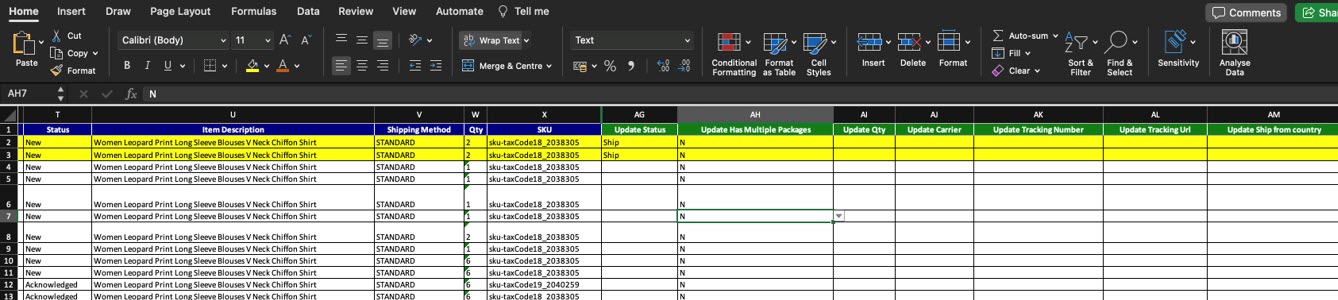
- You must insert a row into the template below the original order line if you are using the bulk upload template to split shipments. For example, the screenshot below shows the multi-quantity line highlighted with quantity 4.

2. To set up a split shipment, insert rows to account for the additional boxes. Due to the size of the items ordered, two units must ship in one box, one unit in a second box, and one unit in a third box.
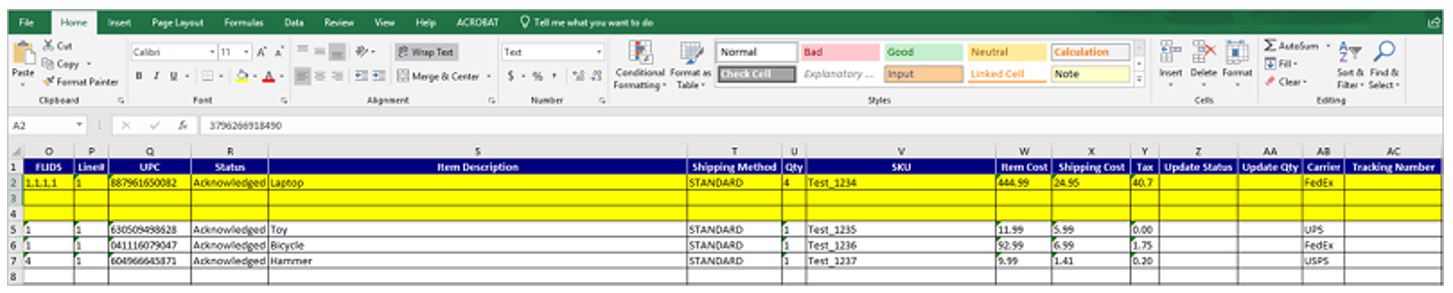
3. Copy the information from the original row to the second row and change the quantity (Qty) to 2 to account for the first box and add the tracking details for the first shipment. Change the item quantity in the new row to 1 indicating the amount shipped in the second box and add those tracking details and so on.

You can partially update orders using Bulk shipments. Just select the quantity you want to update in the current file and upload. Only those items will be updated to shipped. Repeat the process for remaining unshipped items in the subsequent updates.
Multibox Shipments in Bulk
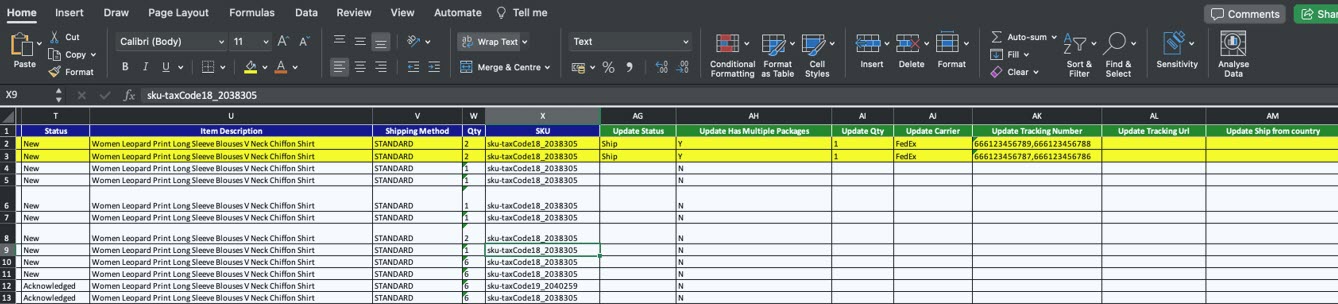
- To Ship an item in multiple packages, update the item status to Ship, update the Update Has Multiple packages column to Y and in the Update Tracking Number column enter the multiple tracking IDs in a comma separated manner. For example, the screenshot below shows the single item to be shipped in 3 packages.
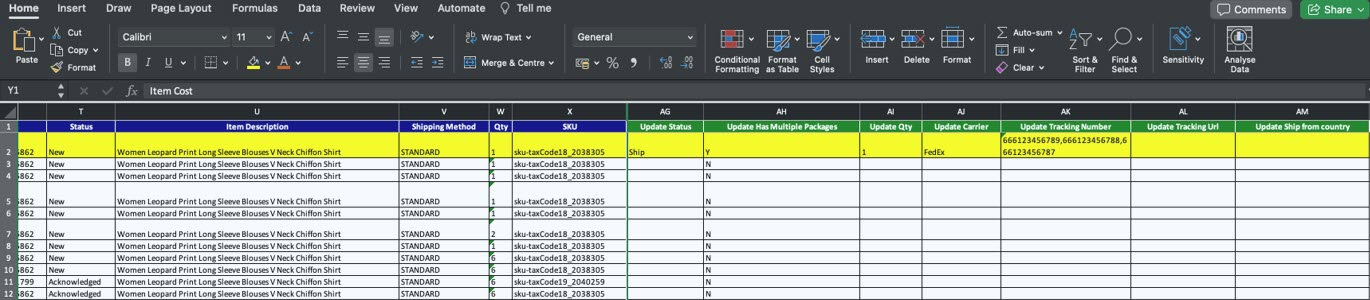
2. You must insert a row into the template below the original order line if you are using the bulk upload template to multi-box shipments for order-lines with multiple quantity. Only 1 single quantity can be multi-boxed at once. For example, the screenshot below shows an order line with 2 quantities shipped in 2 packages each.
3. Copy the information from the original row to the second row and change the quantity (Qty) to 1. Update the item quantity in the new row as well. For both the rows enter the tracking details column with multiple comma separated tracking IDs corresponding to that item packages.
Upload Bulk Order Update Files
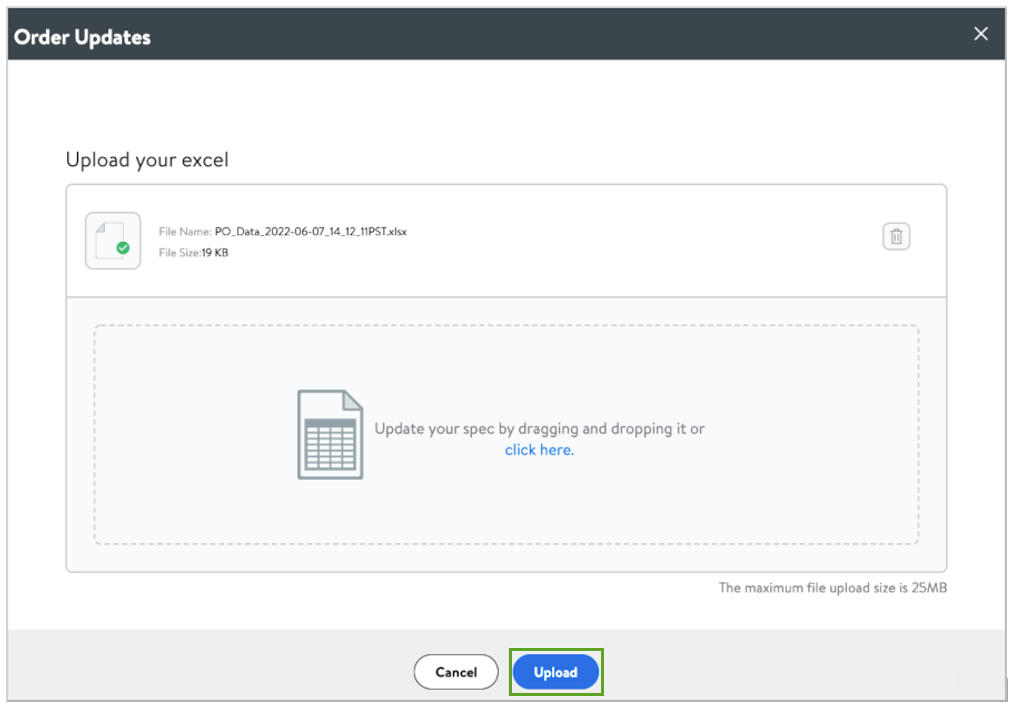
- When the Bulk Order Update file is complete, save the file without changing the file type.
- Select Upload in the top right corner and choose the saved, completed file from the File Explorer.

3. A new view opens with the chosen file and an option to upload additional Bulk Order Update files. Drag and drop or select click here to add additional files then choose Upload.
- Success File: If you successfully uploaded all of your order updates, you would have a file returned to you that says, All the POs updated successfully! Dashboard will update shortly.
- Error File: If you left any rows blank or incorrectly filled out any rows, a file will be returned to you with a list of errors for each row. The error will be listed in the first column of the Excel file that is returned to you. Open the file and review the first column to find out what the issue is. From there, you can resolve the issue in that same file and re-upload the file once you have fixed the issue.