
Getting started
Item setup
Item setup
Item Setup Methods & Overview
Single Item Setup in Seller Center
Quick Setup by Match
Add Items in Bulk with the Full-Setup Template (Version 4.4)
Quick Setup by Match for Multiple Items
Item Setup Tips
Calculating Inventory
Item Setup: How To Create A Great Walmart Item Listing
Make Item Updates
Setting Up Multi-Pack and Custom Items
Competitive Pricing Insights
Update Item Content in Bulk in Seller Center
Item content, imagery, and media
Variant management
Restored or Pre-Owned items
Catalog management
Listing optimization
Order management
Taxes & payments
Policies & standards
Growth opportunities
Shipping & fulfillment
Walmart Fulfillment Services (WFS)
Other Topics


- Overview
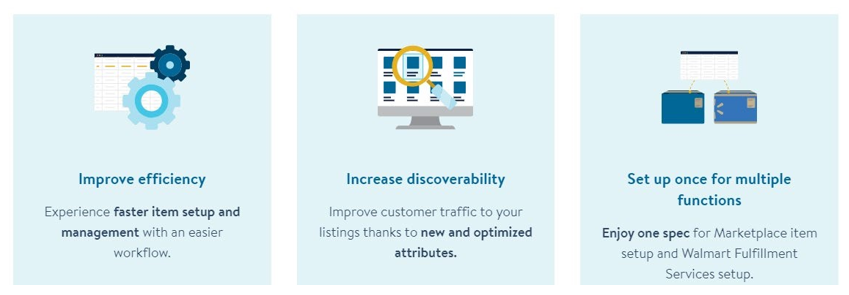
- Benefits of the Full-Setup Template (Version 4.4)
- Before you Start
- Download the Full-Setup Template
- Fill Out the Full-Setup Template
- Definitions & Examples in the Full-Setup Template
- Provide Additonal Images
- Set up a Variant Group
- Add Multi-Select Attributes
- Conditionally Required Attributes
- Sales Restrictions
- Additional Product & Offer Attributes
- Provide Original or New Product Identifier
- Tips
- Upload the Completed Full-Setup Template
- Pre-Validation for Full- Setup Template
- Frequently Asked Questions (FAQs)
Item spec 4.4 is designed to simplify item setup. Improvements such as color-coded attribute sections based on requirements and recommendations makes for a better user experience. However, to get the most out of the full item spec, please carefully review all the attributes and fill out the spec as completely as possible.
Benefits of the Full-Setup Template (Version 4.4)
Before You Start
Check out the Item Setup Tips article for more details.
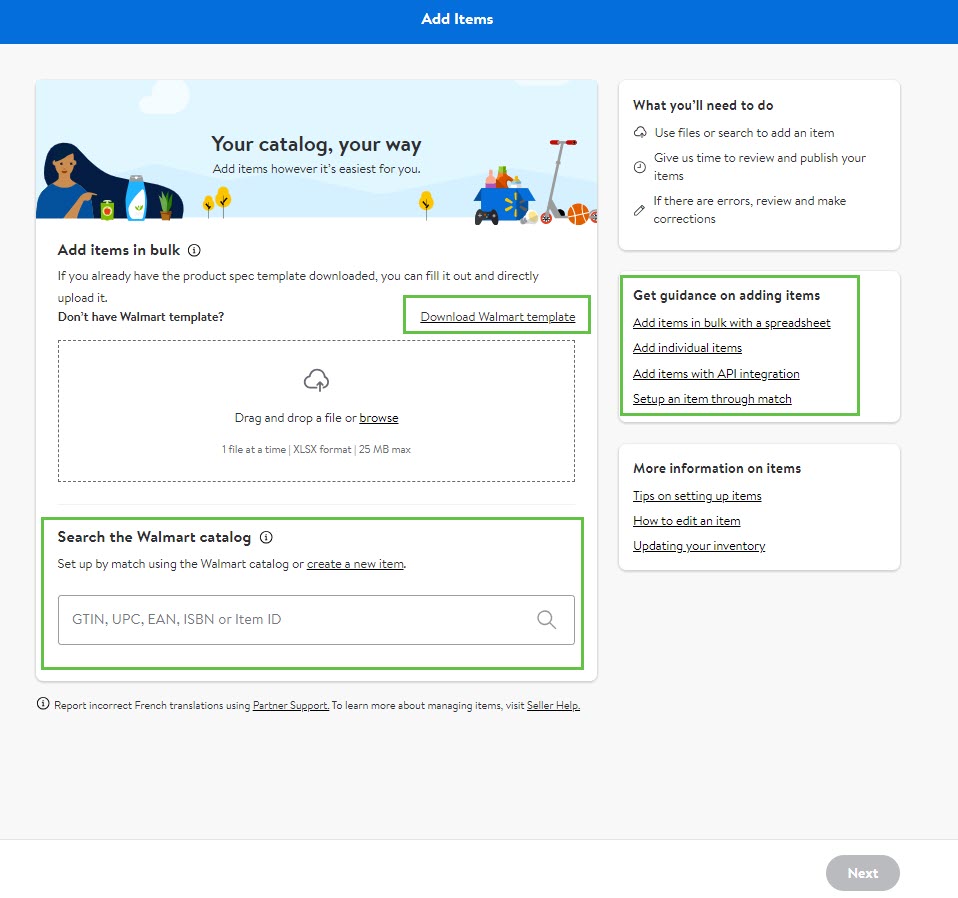
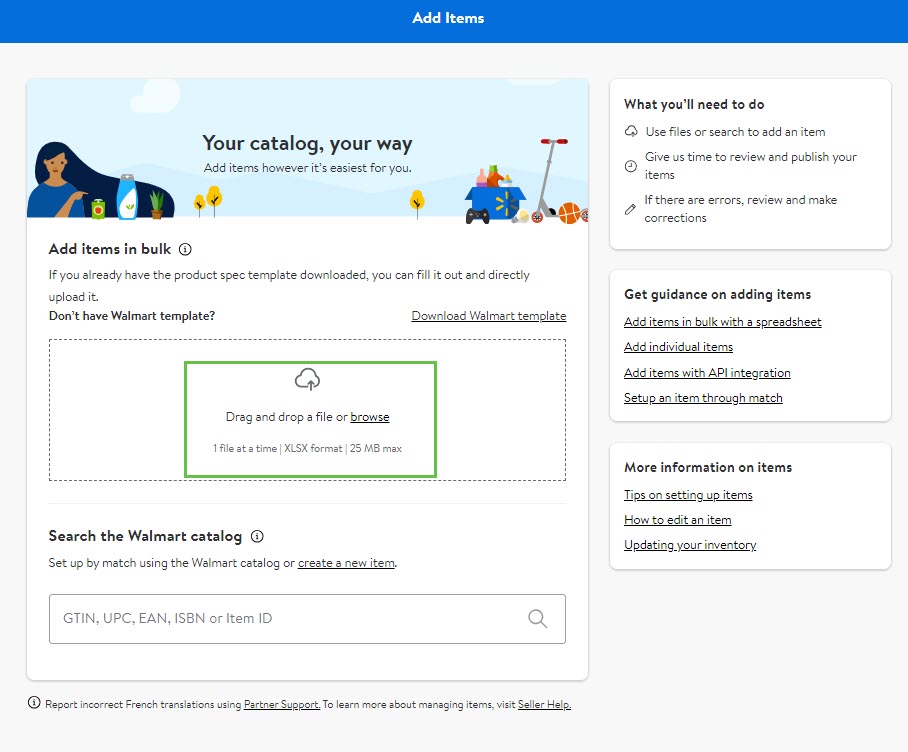
Download the Full-Setup Template
- Login to Seller Center.
- Navigate to the Catalog tab in the left navigation pane
- Click on Add Items.
- Click on Download Walmart Template.
5. Click on the Category dropdown menu under the Full-Setup Template section to select the categories you want, then click Apply. You can choose up to seven item categories.

6. After selecting Apply, the category dropdown will display the number of categories you selected. Verify that the number of categories is correct and then click the Download button to download the Full-Setup Template.
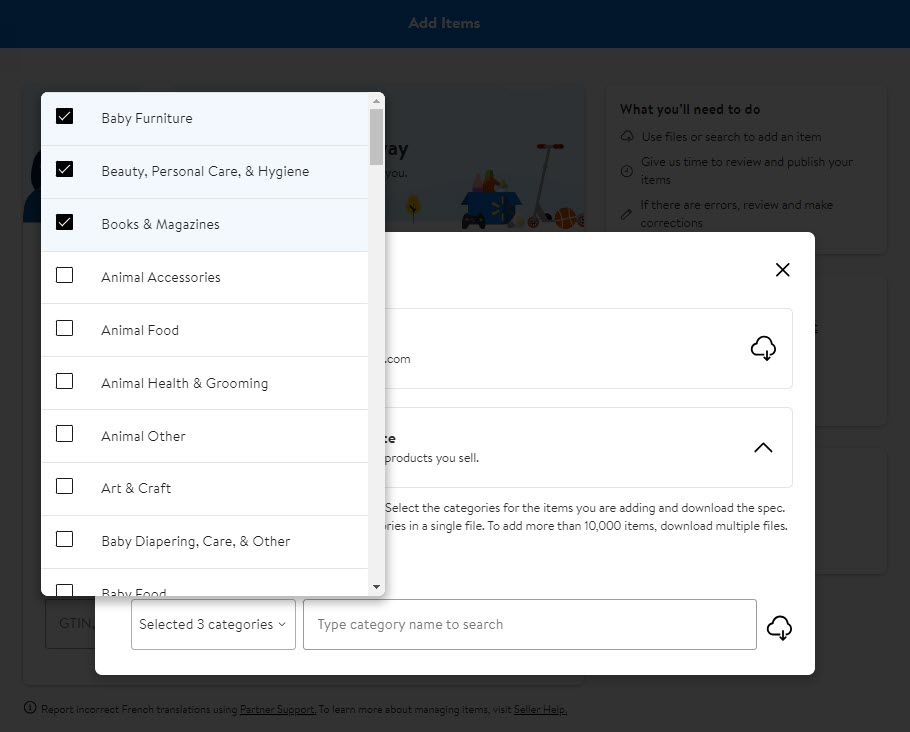
7. The downloaded file can have up to seven in the Excel workbook. Choose the correct category sheet for the items you are setting up to make sure your item is assigned to the appropriate shelf on Walmart.ca.
- Attributes vary by category, so if you aren't sure which category to select, refer to the Item Categorization Guide and Walmart.ca Content Standard Guides. Once an item is set up with the appropriate spec category, the system assigns a Product Type. The Product Type determines the Contract Category and referral fees for your item.
Fill Out the Full-Setup Template
Points to Consider:
- The attributes will vary by product category. Please ensure that you’re using the correct spec sheet to avoid unnecessary listing issues.
- The attributes in the full item spec are in color-coded sections based on requirements and recommendations.
- Carefully review all the attributes and fill out the spec as completely as possible to get the most out of the new full item spec.
- All dates should be entered as YYYY-MM-DD (2023-04-18) or the spec will return with errors.
- Do not enter a dollar sign ($) in the Selling Price column when you’re entering the item’s price.
- The Shipping Weight column should be a number only.
Steps:
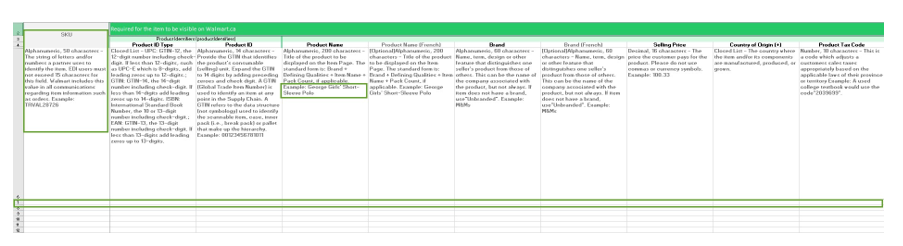
- Fill out the Required for the item to be visible on Walmart.ca section. Be sure to completely fill out the applicable cells. These fields must be populated for your item to successfully set up on Walmart.ca. If any of these fields are missing, your upload will result in feed errors.

2. You will see additional sections for you to fill out to create a richer search and browse experience for customers once you’re finished filling out the required information.
- While these attributes are recommended to help customers find the item on-site, the more information provided, the better the customer experience.
3. There are optional attributes that you may choose to utilize including lag time, start and end dates if you are setting up an item that’s only being sold for a short time, or for hazmat information. 
- If you want to understand more about each field, select, double click, or enable wrap text in the 6th row to see attribute explanations and examples.
- Do not change any data that is visible in this row. All product information should be entered in rows 7 and below.
Row 6 displays: - Whether you should be entering text, a decimal, an integer, etc.
- The character limit for the field.
- Utilize search (Ctrl+F) to search for keywords to find specific attributes.
Definitions & Examples in the Full-Setup Template
Provide Additional Images
If you have more than one image, navigate to the Images columns. The Full Item Spec allows sellers to add additional images upon item setup.

Set Up a Variant Group

Add Multi-Select Attributes

While every category has different attributes, some of the most common multi-select attributes are:
- Key Features
- Additional Image
- Color
- Variant Attributes
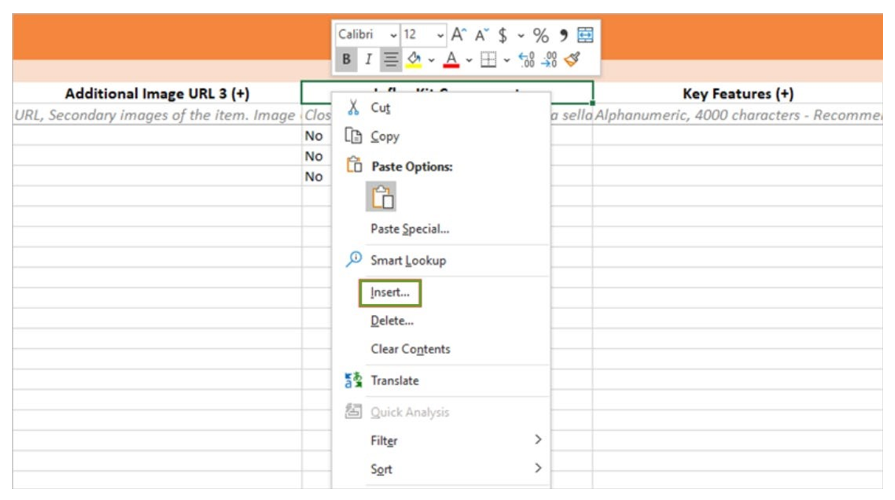
- To add more, right-click the attribute title, or use the Excel Ribbon to add a new column to the sheet.
- The new column will automatically be added to the left. If you want to add columns to the end of a section, select the nearest column on the right.
2. Copy the information from the attribute next to it (highlight the cells in rows 4-6) and paste it into the corresponding new cells. If you would like to keep track of how many additions, you can choose to change the numbers in row 4 (optional).
Conditionally Required Attributes
Some attributes are conditionally required, which means that if you fill out one attribute, the associated cell must be filled out as well. Failing to select the appropriate conditionally required information will lead to data errors.
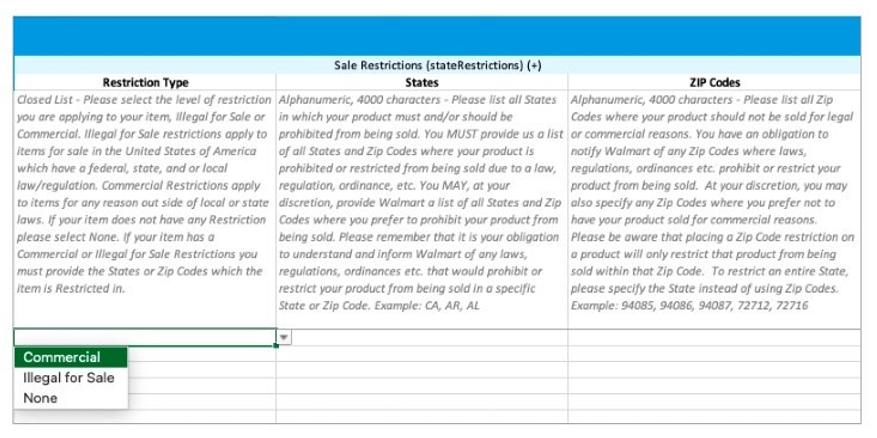
Sales Restrictions
- Restriction Type: Indicate the restriction type: Commercial, Illegal for Sale, or None.
- Provinces: You must list all Provinces where your product should not be sold for legal or commercial reasons.
- Postal Codes: You must list all Postal codes where your product should not be sold for legal or commercial reasons.
You are responsible for the accuracy of the information provided and ensuring that it complies with all laws, regulations, and licensing requirements regarding the sale, shipping, transportation, and delivery of these items. Failure to accurately report information may lead to item removal, account suspension or termination.
Additional Product & Offer Attributes

To provide information for offer attributes not included in the Full Item spec, add them using Additional Offer Attributes*. Use camelCase for the Additional Offer Attribute Name. (Camel Case indicates the separation of words with a single capitalized letter. Example: shopVariantId, shopProductId)
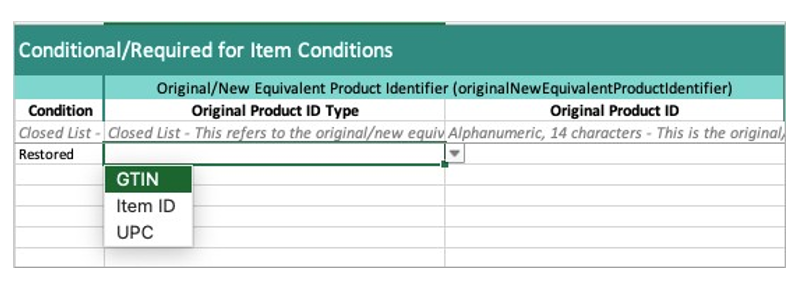
Provide Original or New Product Identifier
- Original Product ID Type: Select the product ID type from the dropdown.
- Original Product ID: Provide the original product identifier of the item as if it were new.
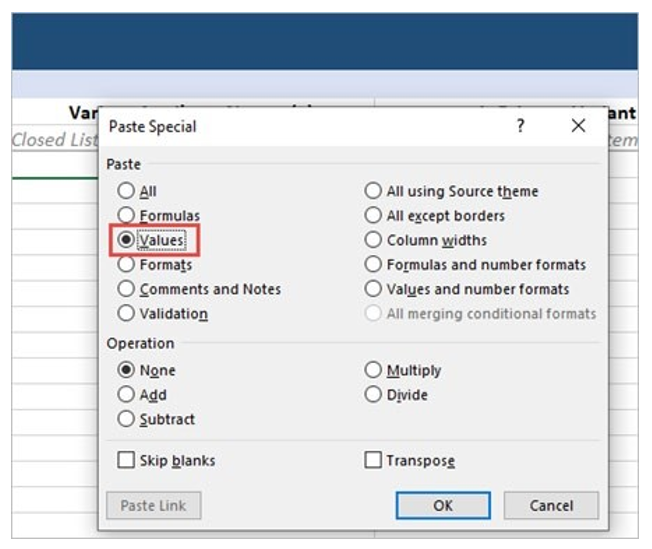
If you are copying data from another file, you must right-click to perform Special Paste and select Values. If you fail to do this correctly, your file upload may return feed errors.

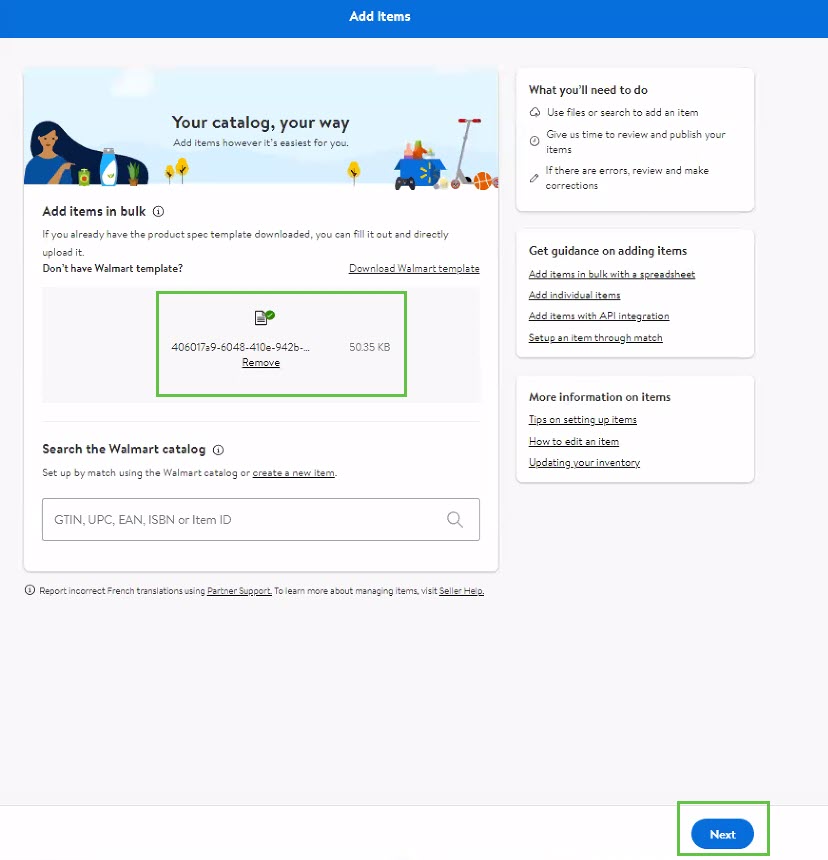
Upload the Completed Full-Setup Template
- In the same dashboard where you downloaded the Walmart Template, you can upload the completed template by either dragging and dropping your file into the drop zone or clicking the click link to select the file from your computer’s file explorer.
If you attach the wrong file type (png, jpg, etc.), an error message will appear until you attach the right file type.
Pre-Validation for the Full-Setup Template
- After you upload a completed spec, our system automatically performs a scan of the document. We check for missing required attributes, incorrect data types, invalid check digits, copy-paste into the wrong fields, and other common errors within a few seconds. If your spec fails pre-validation, you will see an error message, and a report automatically downloads.
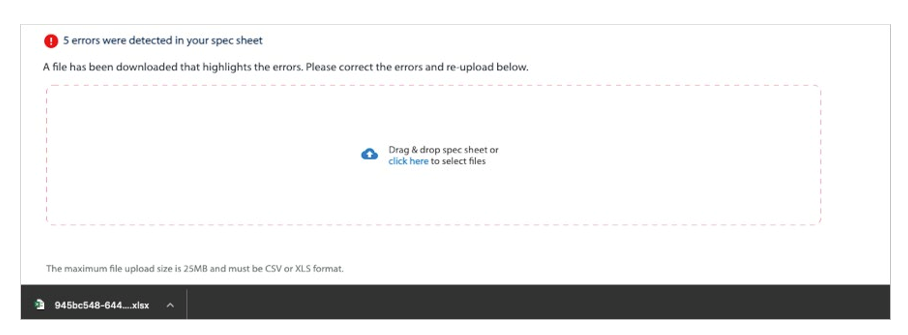
In the error report, you can easily identify the number of errors and the error descriptions in columns A & B. The cells that contain errors are highlighted in yellow.

2. Simply correct the errors and re-upload the error report with the corrected information. Once your upload passes pre-validation, navigate to the Feed Status dashboard to continue the setup process.
Track Activity Feed
- Navigate to the Activity Feed under Items & Inventory in Seller Center to review your item feeds that were successful or resulted in errors.

2. If there are errors, click on the error to review for more details.