Getting started
Item setup
Item setup
Item content, imagery, and media
Avoid Keyword Stuffing
Hosting Images With Walmart
Item Image Guidelines
Rich Media Content for Walmart Marketplace Canada Listings
Product Content Policy
Walmart.ca Content Standard Guides
Understanding the Buy Box
SEO Best Practices for Item Setup
Variant management
Restored or Pre-Owned items
Catalog management
Listing optimization
Order management
Taxes & payments
Policies & standards
Growth opportunities
Shipping & fulfillment
Walmart Fulfillment Services (WFS)
Other Topics


Walmart offers image hosting so that you don't need your own external image space. This article below it show you how to host your images with Walmart.
There are two main benefits to hosting images with Walmart:
- You have your own dedicated image hosting space on our server and tools for efficient processing.
- You can quickly upload image files and associate them with your items.
This article provides details on:
- Obtaining SFTP credentials
- Requirements
- Process flow
- Naming conventions
- Uploading files via SFTP
- Transferring images using a graphical user interface
- Transferring images using a command line interface
- Setting up images
Obtaining SFTP Credentials
You can use Secure File Transfer Protocol (SFTP) to transfer files over a network connection.
Obtaining storage space and credentials
Before you begin transferring files, you must complete the onboarding process. The onboarding process includes:
Requirements
To complete all of the necessary requirements, you will need:
- Image files that fulfill the resolution and size requirements listed in
- Installed SFTP software, such as FileZilla or Win SCP.
- Login credentials from your Integration Engineer.
Process flow
We recommend the following process flow:
- Naming image files in accordance with Walmart’s naming convention (see below).
- Uploading images using SFTP software.
- Setting up items with images.
Naming conventions
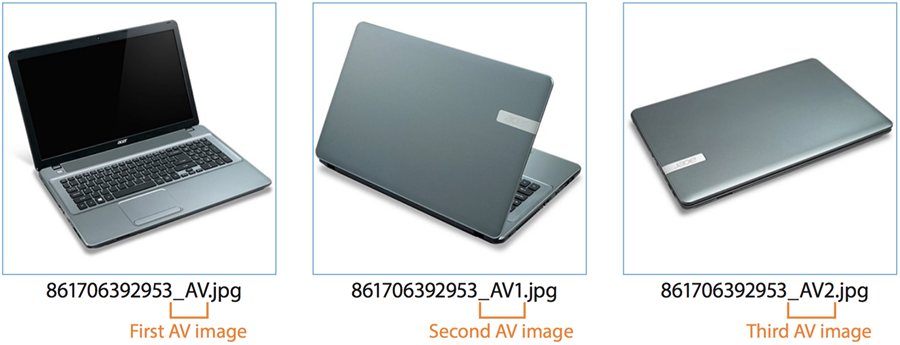
Each image you submit must have a unique file name. Do not upload two or more files with the same name (i.e. shirt.jpg). To ensure unique file names, we recommend naming your files using the UPC as in the images below.

Uploading files via SFTP
There are two ways to connect to the Walmart system and upload files:
- Through a graphical user interface.
- Through a command line interface.
For both, you will need the Partner ID and Password you created during the onboarding process.
Overall instructions
If you have more than 10,000 files to transfer, create the top-level directory. - Any directory you create should follow the Walmart naming convention WM_Images_01...0n.
- If you are using the command line to create directories, use the mkdir <dirname> command.
- If you are using FileZilla or WinSCP, follow their directions on how to create directories and transfer files.
- Only create a one-level directory with image files inside; do not create multi-level subdirectories.
Transferring images using a graphical user interface
You can use FileZilla for Mac and Win SCP for Windows.
Using FileZilla (for Mac)
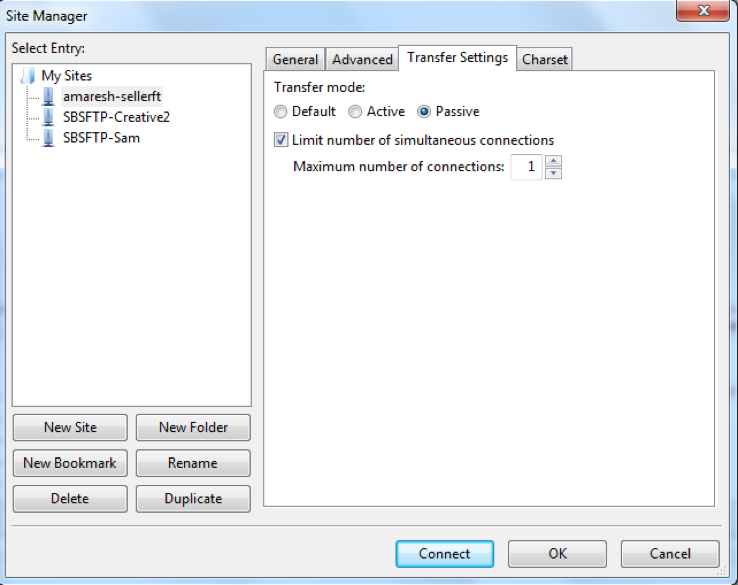
Using Site Manager, configure the Transfer Settings tab:
- Select Active and Limit number of simultaneous connections
- Maximum number of connections, input 1
- Click Connect
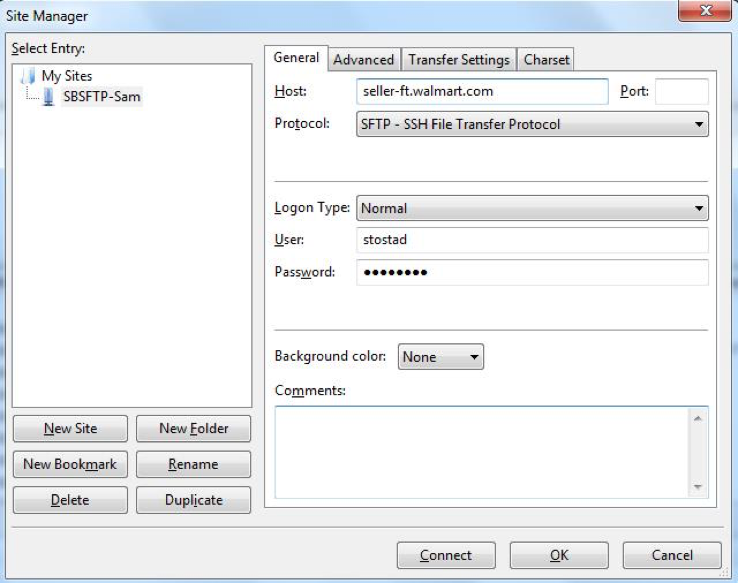
Select the General tab. Then:
- Enter seller-ft.walmart.com in the Host text box
- Select SFTP-SSH File Transfer Protocol for Protoco
- Select Normal for Logon Type
- Enter your Partner ID for User and Password
- Click Connect
Using Win Scp (Windows)
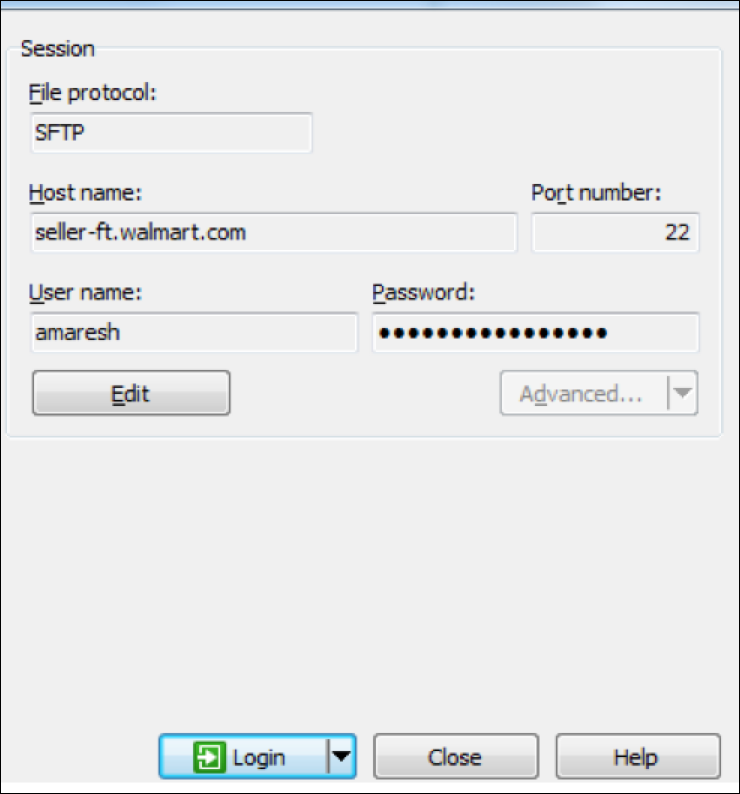
Open the Login page:
- Select File protocol: SFTP
- Enter Host name: seller-ft.walmart.com
- Enter User name and Password
- Click Login
Transferring images using a command line interface
1. Connect a SFTP user to the seller-ft.walmart.com
Connecting to seller-ft.walmart.com...
RSA key fingerprint is 43:90:ac:29:9d:85:a9:e7:f0:3e:98:5d:f1:b9:59:4a.
Are you sure you want to continue connecting (yes/no)? yes
[email protected]'s password:
sftp> lcd
2. Navigate to your directory. For example:
3. Transfer files using the 'put' command. The system shows the status of your uploaded images.
Uploading 4011200296921.jpg to /4011200296921.jpg
4011200296921.jpg 100% 826KB 206.5KB/s 00:04
Uploading 4237.JPG to /4237.JPG 4237.JPG 100% 1598KB 228.3KB/s 00:07
Uploading 4238.JPG to /4238.JPG 4238.JPG 100% 1348KB 224.6KB/s 00:06
Uploading 4239.JPG to /4239.JPG 4239.JPG 100% 1078KB 215.7KB/s 00:05
Uploading 4242.JPG to /4242.JPG 4242.JPG 100% 1076KB 215.1KB/s 00:05
Uploading 4254.JPG to /4254.JPG 4254.JPG 100% 1475KB 245.8KB/s 00:06
Uploading 4261.JPG to /4261.JPG 4261.JPG 100% 1595KB 227.8KB/s 00:07
When you are finished transferring image files, use the ' quit' command to close your connection to the Walmart system.
You can find details on SFTP commands at sftp commands.
Setting up items with images
Via Seller Center
- The Full Item Spec includes the Main Image fields where you can add the image references.

Use the Partner ID you obtained after the onboarding process: - partnerId/imagefilepathname
- If you uploaded images under a directory, follow this directory structure: partnerId/dirname/imagefilepathname
- For example, let’s say you are selling an iPhone case with a UPC barcode as 123456789.jpg. Your Partner ID is “topwmseller” and you uploaded two images: the Main Image is named 000123456789.jpg and the Additional Image is 000123456789_AV.jpg in the main root folder. Your updated Spec may look like this:

Via API
You can use an API POST to create or update items in bulk.
For the Main Image, in the XML payload, add the following attributes:
<mainImage>
<mainImageUrl>partnerId/imagefilepathname
</mainImageUrl>
</mainImage>
For the additional images, in the XML payload, add the following attributes:
<additionalAssets> <additionalAsset> <assetUrl>partnerId/ additionalimagefilepathname1</assetUrl> <assetType>
SECONDARY</assetType> </additionalAsset> <additionalAsset> <assetUrl> partnerId/ additionalimagefilepathname2</assetUrl> <assetType>
SECONDARY</assetType> </additionalAsset> </additionalAssets>